The Alexa rank algorithm is very important it shows you how engaged your visitors are and it has short process of verification.
The algorithm according to which Alexa traffic ranking is calculated, is simple. It is based on the amount of traffic recorded from users that have the Alexa toolbar installed over a period of three months.
Step1
Go to Alexa.com and create an account.

Step 2
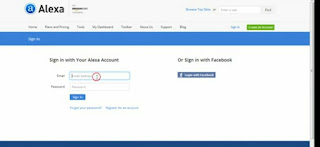
When you will on Alexa account registration page then you need to place your email by which you wants to create your Alexa account. You can also use your Facebook account to Login.
Step 3
When you will place your email address then Alexa will send a verification email to your email account. You only need to Login to your email account, open the email sent by Alexa and click on verification link to verify your account.

Step 4
Now after creating and verifying your account, Go to Alexa site owner page to Claim your site.
Step 5
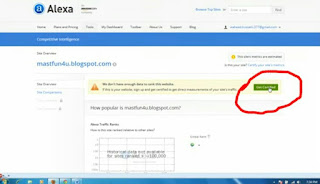
On Alexa site claim page, enter your blog or site URL and click on Continue to claim your site.
Step 6
On the next step, after clicking on Continue, you will be land on a page where you need a select a method to claim your site ownership.
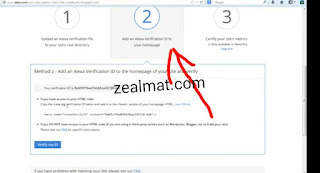
Alexa Will Offer You 3 Methods Which Are Listed Below.

1. Upload an Alexa verification file to your site’s root directory.
2. Add an Alexa verification ID to your homepage.
3. Certify your site’s metrics.
If you are a blogspot user then you should choose 2nd method to claim your site’s ownership by adding an Alexa verification ID to your homepage of your site.
Step 7
When you will choose 2nd method then Alexa will provide you a meta tag Verification ID which you need to paste in <head> section of your homepage HTML.
Step 8
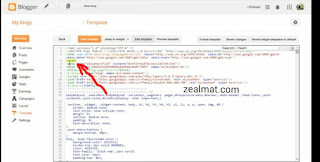
Now Login to your Blogger Dashboard in new window of your browser and Go to Template > Edit HTML.

Make use of CTRL+F to search for
<head> and then paste the HTML code below the <head> tag.
Step 9
Now Go back to Alexa and Click on ” Verify My ID ” button
Step 10
” Your site is successfully Claimed

You Can Also Learn:
The algorithm according to which Alexa traffic ranking is calculated, is simple. It is based on the amount of traffic recorded from users that have the Alexa toolbar installed over a period of three months.
Step1
Go to Alexa.com and create an account.

Step 2
When you will on Alexa account registration page then you need to place your email by which you wants to create your Alexa account. You can also use your Facebook account to Login.
Step 3
When you will place your email address then Alexa will send a verification email to your email account. You only need to Login to your email account, open the email sent by Alexa and click on verification link to verify your account.

Step 4
Now after creating and verifying your account, Go to Alexa site owner page to Claim your site.
Step 5
On Alexa site claim page, enter your blog or site URL and click on Continue to claim your site.
Step 6
On the next step, after clicking on Continue, you will be land on a page where you need a select a method to claim your site ownership.
Alexa Will Offer You 3 Methods Which Are Listed Below.

1. Upload an Alexa verification file to your site’s root directory.
2. Add an Alexa verification ID to your homepage.
3. Certify your site’s metrics.
If you are a blogspot user then you should choose 2nd method to claim your site’s ownership by adding an Alexa verification ID to your homepage of your site.
Step 7
When you will choose 2nd method then Alexa will provide you a meta tag Verification ID which you need to paste in <head> section of your homepage HTML.
Step 8
Now Login to your Blogger Dashboard in new window of your browser and Go to Template > Edit HTML.

Make use of CTRL+F to search for
<head> and then paste the HTML code below the <head> tag.
Step 9
Now Go back to Alexa and Click on ” Verify My ID ” button
Step 10
” Your site is successfully Claimed

You Can Also Learn:
