There is one thing that would make the phone even better—root privileges and Superuser status. It's the only way to take full advantage of the other features like the Quad 32-bit DAC, while getting rid of bloatware at the same time! We will have to wipe the LG V20 storage in order to successfully root it, so be sure to back up your phone before proceeding.
Requirements:
- US open market LG V20 model US996, with an unlocked bootloader
- Windows, Mac, or Linux computer
- USB data cable
Step 1
Install ADB & Fastboot
Installing ADB and Fastboot is a crucial step when it comes to rooting your LG V20. We'll be using ADB to reboot into bootloader mode, then Fastboot to flash a custom TWRP image.
Step 2
Activate Developer Options & Enable USB Debugging
If you've made it this far, that means you've already unlocked your bootloader as per the "Requirements" section. Since that process wiped your data and settings, make sure to activate Developer options and re-enable USB debugging before proceeding.
Step 3
Install TWRP
Once you've enabled USB debugging, connect your LG V20 to your computer and open up command prompt/terminal/command line (use the one corresponding to your OS of choice).Change directories to the platform-tools folder inside of your ADB installation directory, then type in the following command to get ADB going:
- adb start-server
Then, we'll reboot into Fastboot with:
- adb reboot fastboot
Next, download the TWRP IMG file for the US LG V20 at the following link:
After it's full downloaded, type the following into the prompt to flash TWRP on your device.
- fastboot flash recovery twrp-3.0.2-1-us996.img
If the file is not in your platform-tools folder, be sure to type out the full file location for the TWRP IMG (example: fastboot flash recovery C:\Downloads\twrp-3.0.2.1-us996.img). Alternatively, you can click on the IMG and drag it onto the command prompt/terminal/command line window, then hit enter, and Fastboot will flash TWRP to your device.
Step 4
Launch TWRP
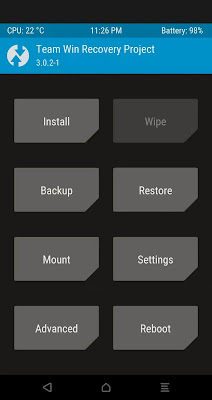
Launching TWRP at this stage can be a bit tricky, so be sure to read through this step fully before starting.Open the back casing and pull out the battery, then put the battery back in and close the casing. Next, press and hold the power button and the volume down button until the LG logo appears. Release the power button for approximately one second, then press and hold it again—release both buttons when the TWRP screen appears.
Step 5
Allow System Modifications
This is when we will wipe the device storage and factory reset, so be sure to back up your data if you used your phone after unlocking the bootloader. When TWRP launches, it will ask you if you want to allow system modifications. We do, otherwise TWRP will need to be reinstalled every time we want to use it. So go ahead and swipe right on that.
Step 6
Decrypt Device Storage
Next, we'll want to decrypt the V20's storage by wiping the device.Tap on the "Wipe" tab, then touch the "Format Data" option. Type in "yes" and tap the little check mark on your keyboard.
Step 7
Reboot TWRP
After using the "Format Data" setting, TWRP will state you might need to reboot TWRP in order to gain access to your data partition, so that's exactly what we're going to do.We're going to reboot to TWRP from TWRP.
Go back to the TWRP main screen, open the "Reboot" tab, then select "Reboot Recovery."
Step 8
Flash SuperSU for System-Less Root
Next, you'll need to flash SuperSU on your phone to permanently root the device. So when TWRP finishes rebooting, tap the "Advanced" tab, touch "ADB Sideload," then swipe the slider to start things up. After that, download the SuperSU ZIP from your computer using the following link, then go back to command prompt/terminal/command line.Type in the following, remembering to use the exact download path to the SuperSU ZIP, or to drag and drop the ZIP like we did with the TWRP IMG earlier.
- adb sideload SR5-SuperSU-v2.78-SR5-20161130091551.zip
Hit enter and wait for TWRP to flash the SuperSU ZIP.
Step 9
Reboot & Verify Root
Reboot your phone once TWRP finishes installing SuperSU, and you should be fully rooted when you get back up. To verify this, download an app called Root Checker by developer joeykrim.From there, just open the app, then tap "Verify root" and press "Grant" on the Superuser access request. If everything went off without a hitch, you'll see a message saying "Congratulations! Root access is properly installed on this device!"
You have successfully root your LG V20.


No comments:
Post a Comment
We Love Comments